Monitor IBM Domino with SNMP
I’m working alot with PRTG lately, monitoring IBM (Lotus) Domino is a simple, but not so well documented task, so figured i’d write down a “howto” 🙂
Start with adding the SNMP Service to you windows installation through “Server Manager”, and let it install – normally it dont need a reboot.
![]()
![]()
![]()

After the installation of the service is complete, go to the services console and right-click the SNMP Service, and click properties

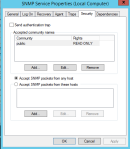
Go to the security tab, disable “Send Authentication trap”, add a community – often “public”, for monitoring purposes “Read Only” is enough.
Allow the host you want, or any host to access the SNMP data.

Now we’re gonna install the Domino SNMP Agent service, which feeds data to the Windows SNMP agent:
Open a command prompt with administrative priveleges, and write:
CD C:\Program Files\IBM\Domino

LNSNMP -Sc

net start lnsnmp
TIP!
If you get this error while trying to install the Domino SNMP Agent service (LNSNMP -Sc), most likely you didnt do step 1 and install the Windows SNMP Service.
Error opening registry key "SNMP"

Error Detail: RegOpenKeyEx error code 2 (The system cannot find the file specified.)

Full key: SYSTEM\CurrentControlSet\Services\SNMP\Parameters\ExtensionAgents

Service deletion failed.
Lastly you need to force Domino to write stats to the SNMP Agent, this you do by launching the Domino Console, and sending these commands:
load quryset

load intrcpt

load collect

This needs to be done everytime the Domino server is restarted, so you need to add it to the Domino servers notes.ini file.
F.ex:
ServerTasks=Replica,Router,Update,AMgr,Adminp,Sched,POP3,quryset,intrcpt,collect
The Domino.mib is located in the “C:\Program Files\IBM\Domino” folder, and you can use this with PRTG, SNMPwalk or whatever tool/application you want.
Tips for useful OID’s for Domino, can be found here: Ajitabh Pandey’s blog
MDT 2012 – deployment
Simple Win7 / Win8 deployment – mostly settings for my own use i guess 🙂
Customsettings.ini:
[Settings]
Priority=Default
Properties=MyCustomProperty

[Default]
_SMSTSOrgName=IT Department
OSInstall=Y
SkipCapture=YES
SkipAdminPassword=YES
SkipProductKey=YES
SkipComputerBackup=YES
SkipBitLocker=YES
SkipAppsOnUpgrade=NO
SkipUserData=YES
SkipApplications=NO
JoinDomain=DOMAIN.LOCAL
DomainAdmin=administrator
DomainAdminDomain=DOMAIN.LOCAL
DomainAdminPassword=Passw0rd!
SkipDomainMembership=YES
SkipLocaleSelection=YES
KeyboardLocal=no-nb
UserLocale=no-nb
UILanguage=no-nb
SkipTimezone=YES
TimeZoneName=W. Europe Standard Time
SkipSummary=YES
SkipFinalSummary=YES
SkipRoles=NO
SkipTaskSequence=NO
FinishAction=REBOOT
HideShell=Yes

WUMU_ExcludeKB001=KB976002 ;Microsoft Browser Choice Screen Update for EEA
And the Bootstrap.ini
[Settings]
Priority=Default

[Default]
UserID=administrator
UserDomain=DOMAIN.LOCAL
UserPassword=Passw0rd!
DeployRoot=\\VM-DC-01\DeploymentShare$
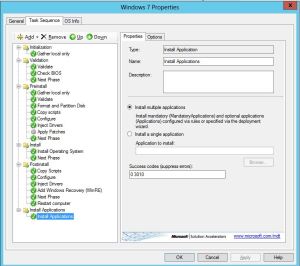
Simple task sequence for new deployment, without all the USMT hassle..

Win7 is ofc deployed from the updated image created in my previous post
Slipstream windows updates into Windows 7 SP1 media
Its impractical to deploy new Windows 7 machines today and having to run 130(!!) updates for hours afterwards..
So why not update the Installation media with the latest updates?
Here is how i did it anyway..
Download “Windows Update Downloader” from here: http://www.windowsupdatesdownloader.com/ProgramFiles.aspx
and get the corresponding updatelist from here: http://www.windowsupdatesdownloader.com/UpdateLists.aspx
Install and download all the update files to D:\temp\W7\WU (make sure you dont check “Product as subfolder” or “Category as subfolder” under options – all updates (*.msu files) has to be in that folder.
Delete (or unselect from download) the update named KB2533552 – it cannot be offline integrated and needs to be installed after installed (it will fail if not)
Then delete (or unselect from download) the updates named KB2506143 and KB2603229, it will make the install fail.
Extract the W7 iso to D:\temp\W7\ISO with f.ex 7-zip (http://www.7-zip.org)
Create a a folder for mount point: D:\temp\W7\mount
Start a elevated command prompt and run this:
dism /Mount-Wim /WimFile:D:\temp\W7\ISO\sources\install.wim /index:1 /mountdir:D:\temp\W7\mount
dism /image:D:\temp\W7\mount /add-package /packagepath:D:\temp\W7\WU
dism /Unmount-Wim /MountDir:D:\temp\W7\mount /commit
Now you can use the source from the ISO folder to f.ex. create a USB install media or create a new ISO with it and boot from CD.
Tftpd64/32 IP-format in tftpd32.ini
In a project here at work, we wanted to script the IP_Pool, DNS, Mask and Gateway settings of tftpd32.ini.
They use an obscure format, negative decimal; here is a script to first convert from decimal (normal) ip-address, to a negative decimal that can be saved in the ini file 🙂
Hope you can use it for something 🙂
param($a=$(throw "You must specify the A net"),$b=$(throw "You must specify the B net"),$c=$(throw "You must specify the C net"),$d=$(throw "You must specify the D net"))

$hexa = [String]::Format("{0:x}", $a)
$hexb = [String]::Format("{0:x}", $b)
$hexc = [String]::Format("{0:x}", $c)
$hexd = [String]::Format("{0:x}", $d)

$hexip = $hexd+$hexc+$hexb+$hexa
$decip = [Convert]::ToInt32($hexip, 16)

return $decip
Create a bootable VMware ESXi5 and ESXi6 USB-stick for installation
Sometimes its useful to have a usb-stick (or disk) which can be used to install a new host from, for ESXi 5 and ESXi 6 the easiest way (imho) on windows, is as follows:
Exchange 2007: Exporting mailboxes to PST
OK – my first published PowerShell script.
It uses a CSV file “export_users.csv” that contains username in old domain “oldaccount” and username in new domain “newaccount”.
It has to be run on a computer/server which has exchange management console, activeroles powershell addons by quest, and outlook installed on it in the same domain as the exchange 2007 installation.
And of course, the user you run this script as, has to have correct permissions on the mailboxes you intend to export.
The PST files will be exported to “D:\PST” and logs to “D:\Logs”, “Deleted items” and “Junk E-Mail” will NOT be exported, by default it will run 4 simultanious exports.
Hope its useful 🙂
Welcome
Ok, first post on my new blog.. guess I should say something interesting; but I really dont have anything – YET 🙂
Anyway, I hope the important posts are comming in a short while.. just gotta take the time to write them..
/Chris..


